Traveling to Turkey — whether it’s to explore Istanbul’s historic skyline, relax on Antalya’s beaches, or watch balloons rise over Cappadocia’s valleys — you’ll almost certainly want reliable mobile data. Traditional SIM cards can be inconvenient to buy abroad, and roaming from your home carrier can be expensive. That’s why many tourists today choose eSIMs — digital SIM profiles you install directly on your phone. Among the most popular travel eSIM options is RORO eSIM, which lets you buy and install your plan before departure so you’re ready to connect as soon as you land in Turkey.
Installing a Turkey eSIM on your iPhone 15 is straightforward when you know the steps — and doing it before you leave home is especially important, as some eSIM provider websites and apps may be restricted once you’re in Turkey.
What You Need Before You Begin
Before you start, make sure you have the following:
An eSIM-compatible phone: Your iPhone 15 supports eSIM without needing a physical SIM card.
RORO eSIM QR code or activation details: After you buy a Turkey data plan from RORO, you’ll receive a QR code via email or through the RORO dashboard.
Stable internet: A good Wi-Fi or existing mobile data connection is needed to download and configure the eSIM.
Install before departure: Because Turkey may block some provider sites and apps once inside the country, it’s best to install and test your eSIM before arrival.
Step-by-Step: Installing RORO eSIM on iPhone 15
1. Buy and Receive Your eSIM
Visit the RORO eSIM site and choose a Turkey data plan that fits your needs (e.g., 5 GB for short trips or a longer unlimited-style plan).
Complete the purchase and check your email for your QR code and any installation details.
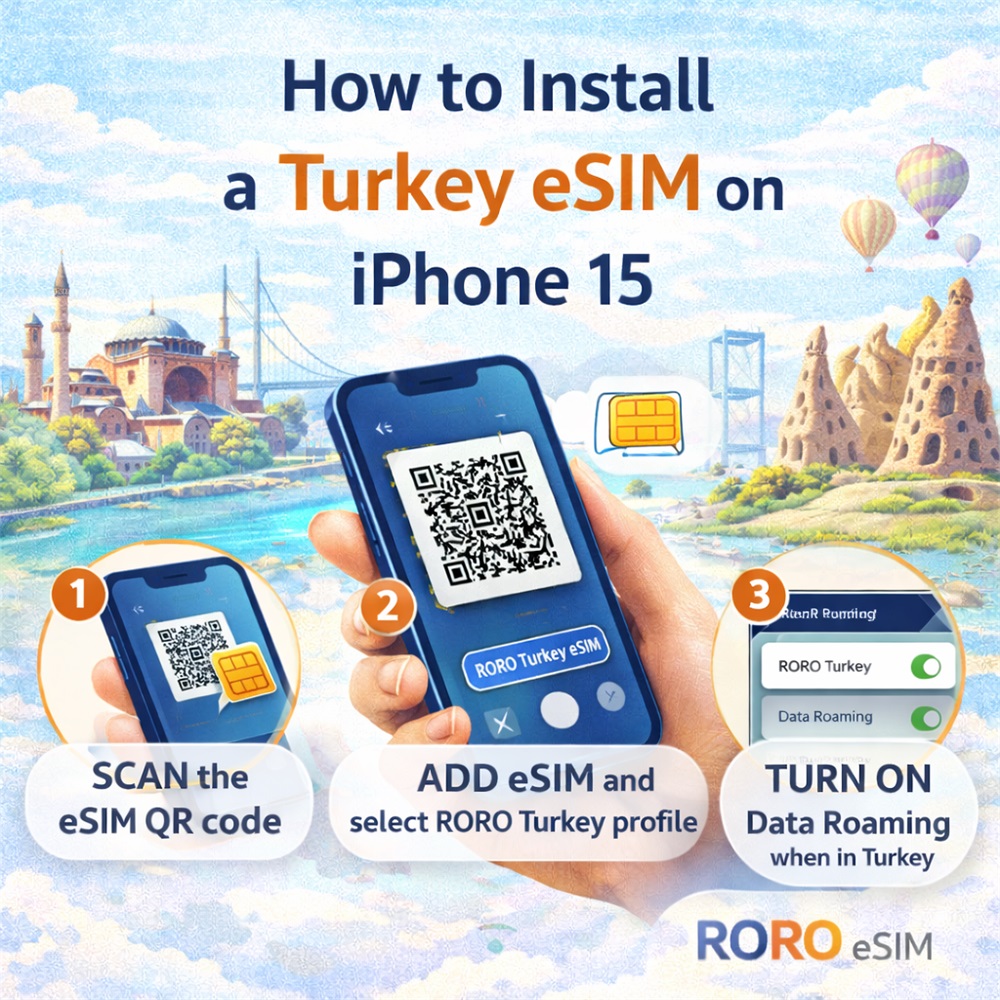
2. Start the Installation on Your iPhone
Open the Camera app and point it at the RORO eSIM QR code.
On recent iPhones with iOS 17.4 or later, after you scan the code, you’ll see a prompt like “Mobile Plan Detected”. Tap it and then “Allow.”
Tap “Add eSIM” when prompted.
Alternately — if scanning doesn’t work or you prefer to install manually:
Go to Settings → Mobile Service → Add eSIM → Use QR Code and manually scan the code from your screen or email.
If needed, choose “Enter Details Manually” and type the activation info (SM-DP+ address and activation code).
3. Label Your eSIM
Once recognized, your iPhone will ask you to label the eSIM (e.g., RORO eSIM – Turkey). This helps you manage multiple profiles — especially useful if you keep your home SIM active for messages and calls.
4. Choose Your Default Data Line
You’ll be asked how you want to use your lines:
Primary line: Usually kept for your home number’s SMS and calls
RORO eSIM: Best for mobile data in Turkey
Set your RORO eSIM as the default data line so your iPhone knows to use it for internet once activated.
Activating Your Turkey eSIM
After installation, your RORO eSIM is stored on the phone — but you don’t need to turn it on until you arrive in Turkey. Follow these steps once you land:
Go to Settings → Mobile Service (Cellular).
Select your RORO eSIM profile.
Turn on Data Roaming for the RORO profile.
Disable data roaming on your primary SIM to avoid unwanted charges.
Your phone should now connect to local Turkish networks, giving you mobile data for navigation, messaging, ride apps, and browsing without waiting in SIM lines.
Tips for a Smooth Setup
Install before departure: Because of recent restrictions on eSIM provider apps and websites in Turkey, setting up before arrival avoids connectivity problems.
Test your setup at home: After installing your RORO eSIM but before activating it, confirm that the profile appears under your mobile settings.
Keep QR code handy: Save the QR code or installation email in case you need to reinstall or troubleshoot.