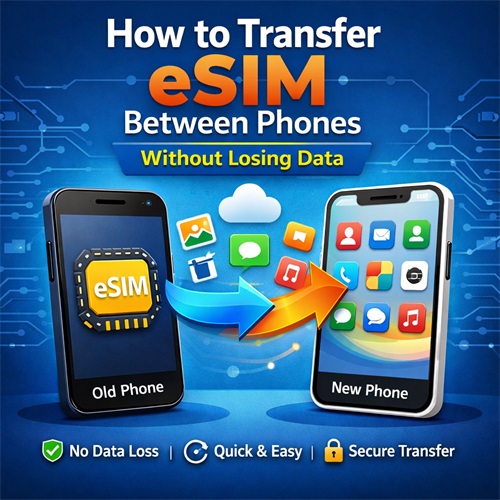
Switching to a new phone in 2026 doesn't have to interrupt your connectivity, especially with data-only eSIM services like RoRo eSIM
RoRo provides affordable, high-speed data plans covering over 200 countries, including seamless U.S. coverage via local networks. Since RoRo eSIM is purely data-focused (no calls or texts), transferring it to a new device is straightforward and helps avoid data loss or wasted validity days. The key is reinstalling the profile on your new phone using the original QR code or activation details—most travel eSIMs like RoRo support re-installation without invalidating the plan, as long as it's not already active on another device.RoRo's data-only nature simplifies things: your plan remains tied to the profile, not a phone number, so reactivation preserves remaining data and validity.Step-by-Step Guide to Transfer RoRo eSIM to a New PhonePrepare Before Switching
Ensure your RoRo eSIM is purchased and installed on your old phone (or keep the QR code/email handy from purchase). Back up your old phone's data via cloud or cable. Note your remaining data balance and validity period in the RoRo app or "My SIMs" dashboard. Confirm your new phone supports eSIM (use *#06# to check for EID, or see RoRo's compatibility FAQ).
Delete the eSIM from Your Old Phone (If Needed)
Many providers, including travel eSIMs, require removing the profile from the old device before reinstalling. iPhone: Settings > Cellular > Select RoRo eSIM > Remove Cellular Plan (or Delete eSIM). Confirm deletion.
Android: Settings > Network & Internet > SIMs/Mobile Network > Select RoRo eSIM > Remove or Erase SIM.
This frees the profile for reinstallation—RoRo allows re-downloads if supported.
Install on the New Phone
Use stable Wi-Fi for setup. Access your RoRo account via https://roroesim.com/ or the app → "My SIMs" to retrieve the QR code or manual details (SM-DP+ address, activation code).
iPhone: Settings > Cellular > Add eSIM > Use QR Code (scan) or Enter Details Manually. Follow prompts to download and label it "RoRo Data."
Android: Settings > Network & Internet > Mobile Network/SIM Manager > Add eSIM > Scan QR or Enter Manually. Confirm installation.
If your plan was active, it should resume automatically upon connecting (enable data roaming if prompted).
Activate and Verify
Turn on mobile data for the RoRo eSIM and test connectivity. Your data usage and remaining validity continue uninterrupted—RoRo activates validity only upon first use, and re-installation doesn't reset it. Monitor via the RoRo dashboard. Enable hotspot if sharing data with other devices.
Tips to Avoid Losing Data or IssuesDon't delete the old eSIM until the new one is installed and working to prevent gaps.
If the QR code expires or issues arise, contact RoRo support—many travel eSIMs issue new codes for re-installation.
For cross-platform switches (Android to iPhone or vice versa), manual QR reinstallation works best, as direct transfers may not apply to third-party eSIMs.
Keep your old phone powered on nearby during setup in case any prompts appear.
Transferring RoRo eSIM is hassle-free compared to physical SIMs—no carrier visits or number porting needed. This keeps you connected during upgrades or repairs, ensuring seamless data for navigation, streaming, or work across the U.S. and beyond. Upgrade confidently with RoRo!