Before you start, please make sure that:
- Your phone is eSIM compatible. Check the eSIM compatible list here.
- You have the eSIM installation QR codeor activation code in your phone or infront of you.
- You have a stable Wi-Fi connection.
Once you have everything prepared, follow the steps below to easily install and activate your RORO eSIM on both iPhone and Android devices. Remember to complete the installation before your trip and activate the eSIM once you arrive at your destination.
eSIM Installation Guide for iPhone
Option 1: Quick Install If You Have iOS 17.4 or Newer In Your iPhone
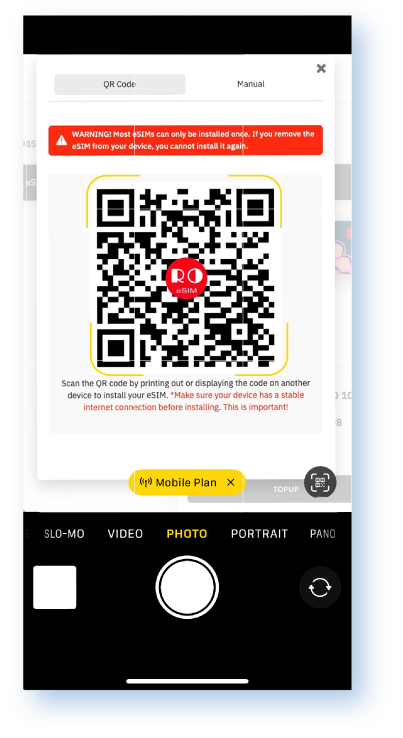
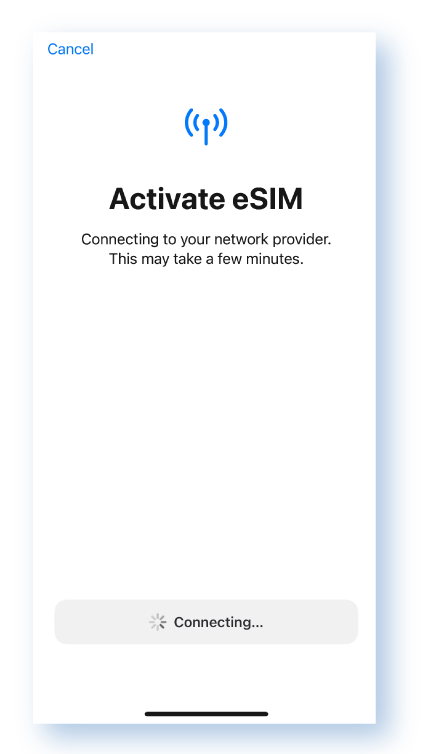
Open the rear camera of your iPhone and point it at the eSIM QR code. Your iPhone will automatically recognize the eSIM. Tap “Mobile Plan” showing up under the screen and click "Allow" to activate the new eSIM. It will be installed immediately.
|
Use camera to face the QR code, then click “Mobile Plan” |
Click “Allow” to proceed |
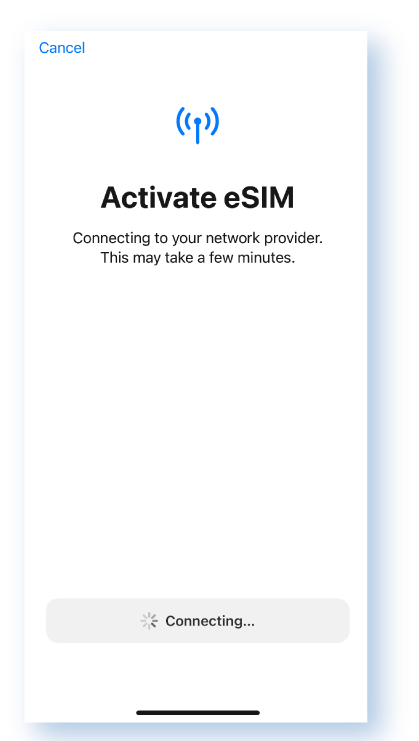
Start installation and complete within 1 minute |
 |
 |
 |
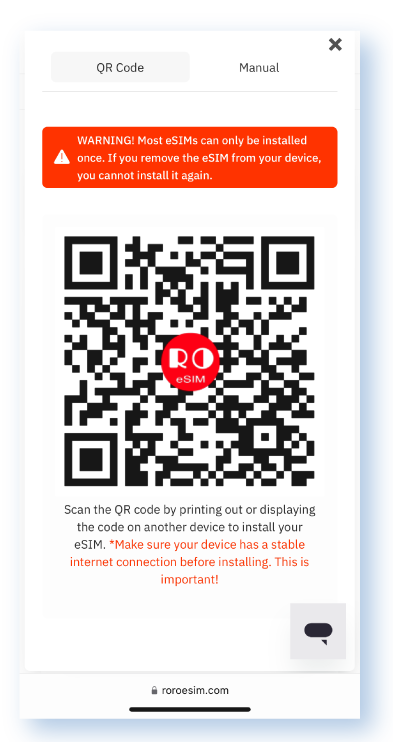
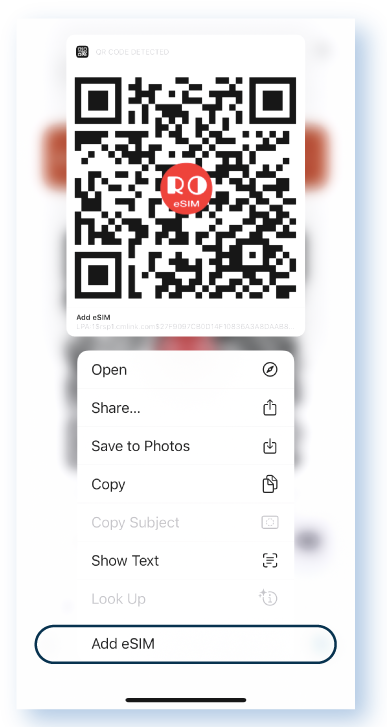
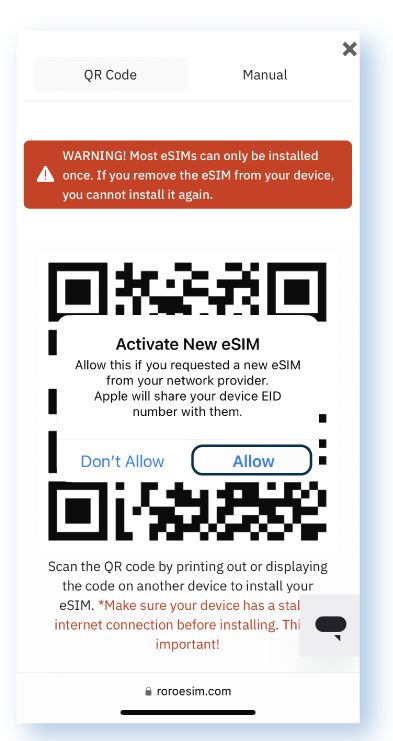
Or you can Log in to “My SIMs” on roroesim.com or RORO App on your phone, click Install eSIM then press the QR code on your iPhone’s screen. It will start the eSIM installation directly.
|
Use your phone to log in to “My SIMs” and find the QR code in “Install eSIM” |
Press the QR code on your iPhone screen then click “Add eSIM” |
Click “Allow” to start the installation and complete within 1 minute |
 |
 |
 |
Option 2: Scan QR Code to Install From “Settings”
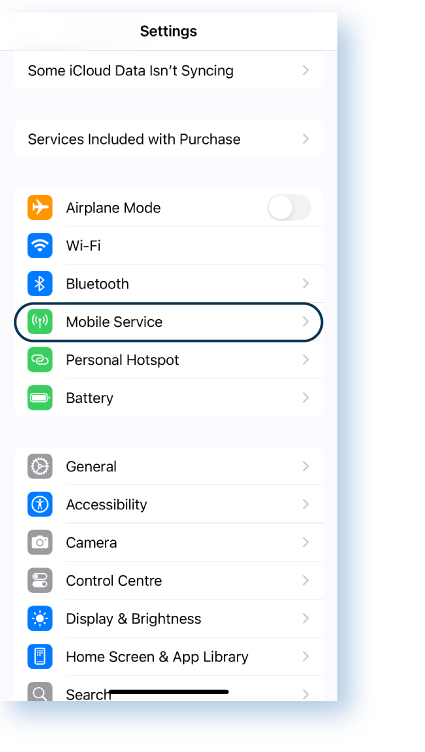
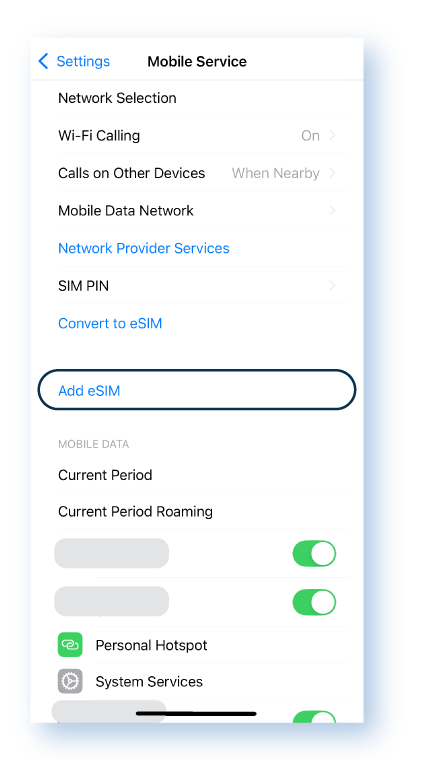
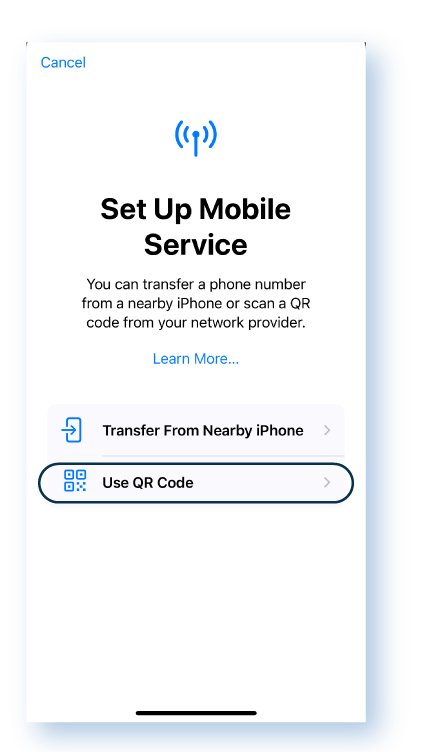
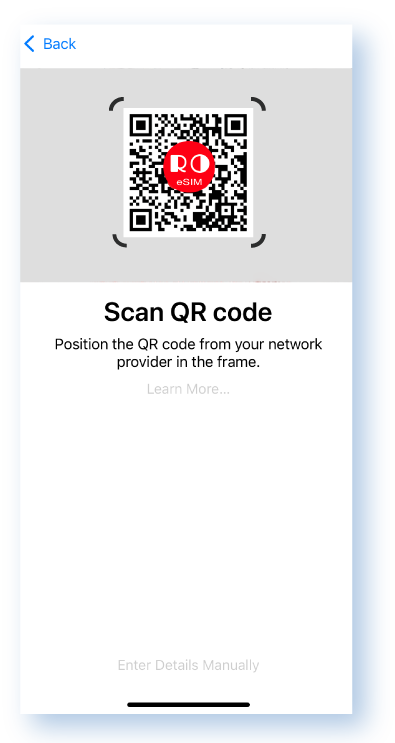
Go to Settings > Mobile Service > Add eSIM > Use QR Code > Scan QR code
|
Click “Mobile Service” in “Settings” |
Click “Add eSIM” in “Mobile Service” |
Click “Use QR Code” |
Scan the prepared QR code and start the installaltion |
 |
 |
 |
 |
Option 3: Manually Install With Activation Code
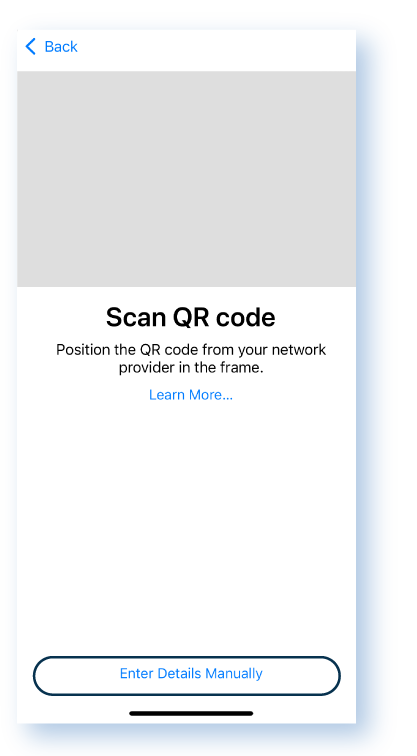
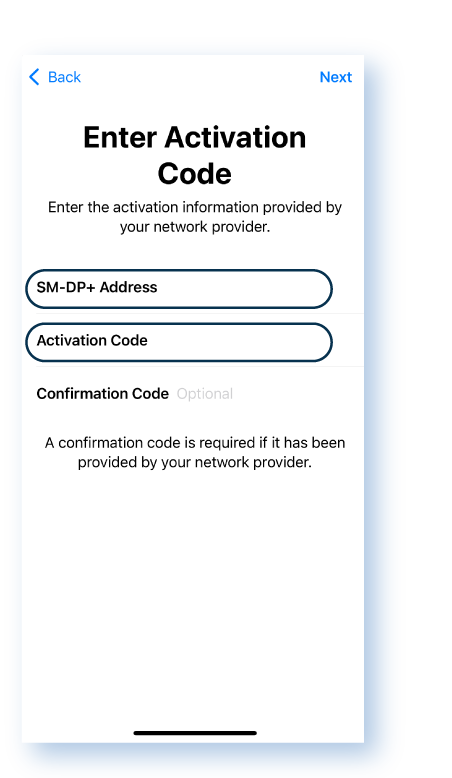
Go to Settings > Mobile Service > Add eSIM > Use QR Code > Enter Details Manually, then copy or type in the required info.
Click ![]() besides SM-DP+Address and Activation Code to copy, which can be found in My SIMs after log in to www.roroesim.com or RORO App.
besides SM-DP+Address and Activation Code to copy, which can be found in My SIMs after log in to www.roroesim.com or RORO App.
|
Go to Settings > Mobile Service > Add eSIM > Use QR Code |
Choose ”Enter Details Manually” |
Copy or type in the info then click “Next” at up-right corner |
Click “Continue” to start and complete the installation |
 |
 |
 |
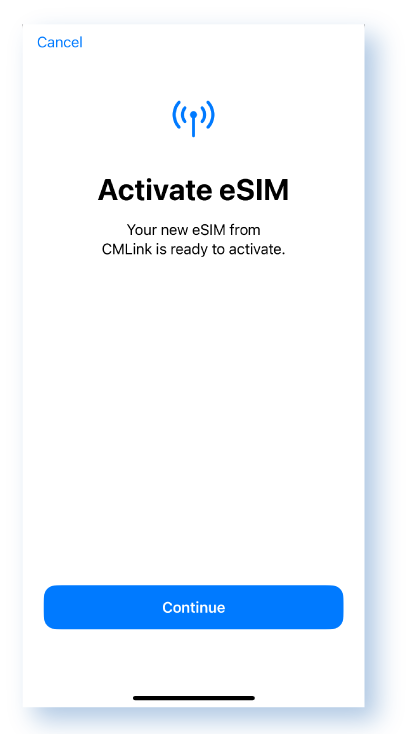 |
Label your eSIM: RORO eSIM is reusable. You can keep it in your phone for your future trips with only one installation.
|
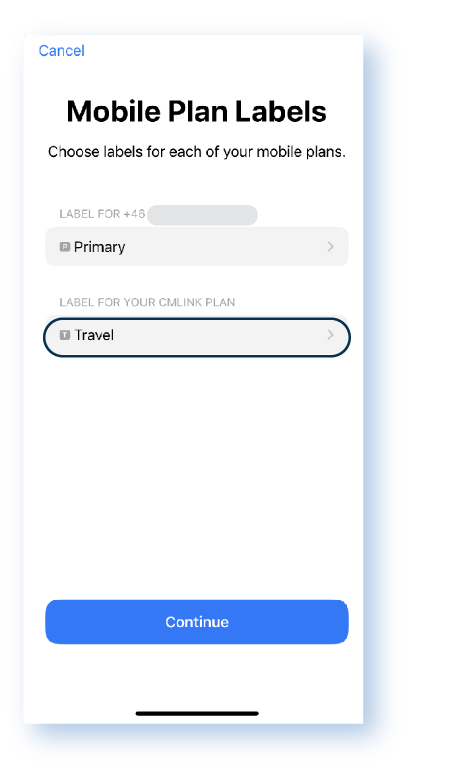
After installation, Mobile Plan Labels show up directly |
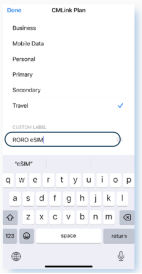
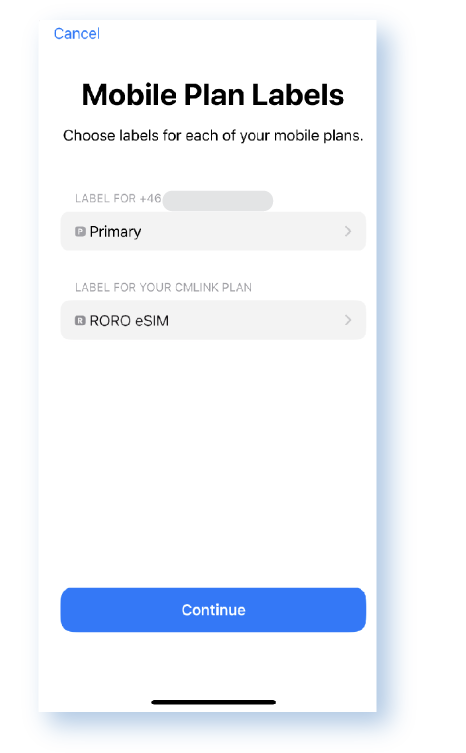
Select the new eSIM and click Continue, you can customize your label |
We suggest label it to “RORO eSIM” for easy manage |
 |
 |
 |
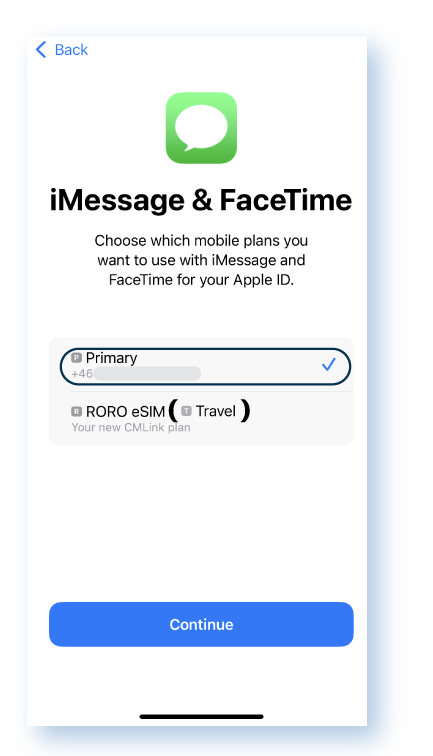
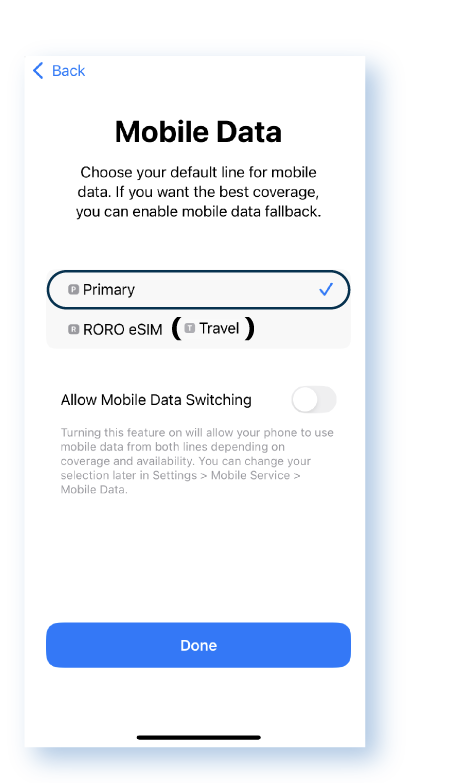
Set up: Now you have the original primary SIM card and newly installed eSIM in your phone. You need to choose which line you want to use.
|
Choose your Primary number for iMessage & FaceTime, your contacts can reach you on your primary number |
Choose your Primary number for Mobile Data if you are not in the destination yet. |
 |
 |
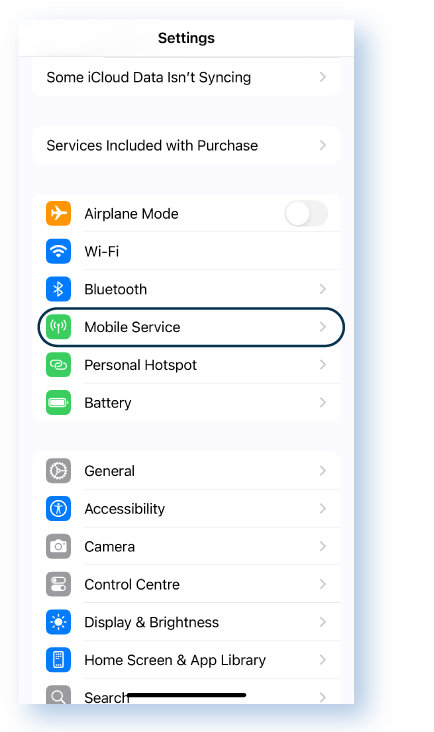
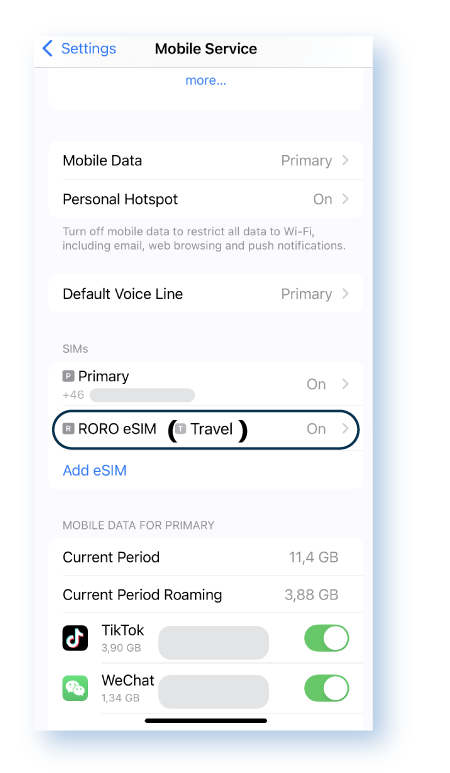
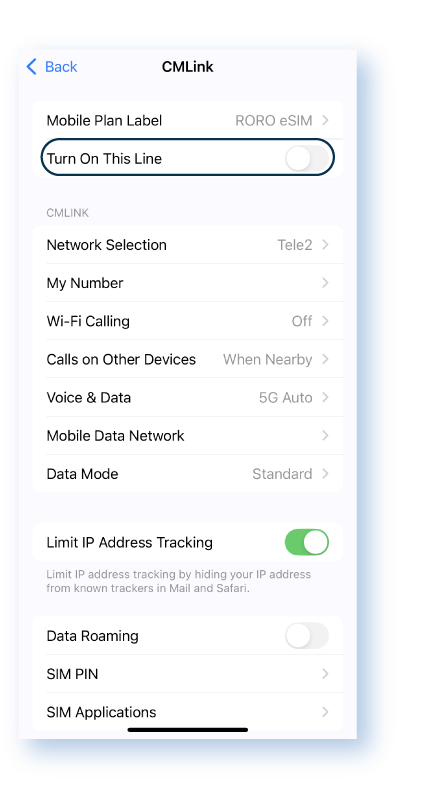
Keep the new eSIM line off until you arrive at your destination. The data plan will activate and validity days start counting from the minute that the eSIM connecting to the supporting network.
|
Go to Settings then click Mobile Service |
Choose RORO eSIM, the newly installed eSIM |
Keep the line off, do not turn on until you arrive at your destination |
 |
 |
 |
eSIM Activation Guide for iPhone
Turn on your eSIM’s Data Roaming and turn off primary number’s Data Roaming/ Data switching to avoide high roaming cost from the primary number. Using primary number as the default voice line to keep connected with your contacts.
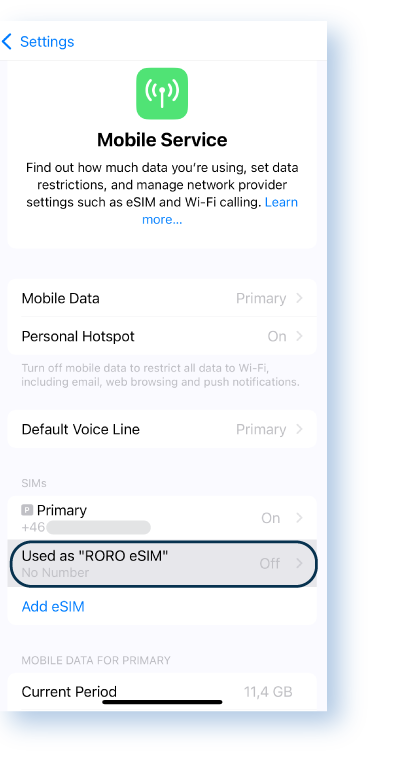
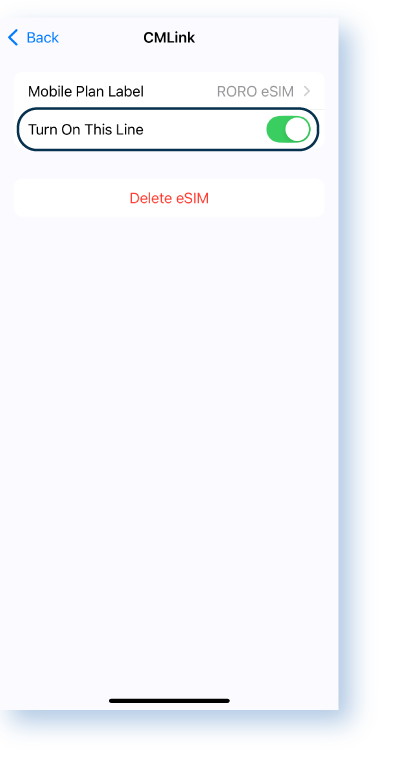
After your flight landed at your destination, you can activate your eSIM immediately.
|
Go to Mobile Service in Settings, click RORO eSIM |
Turn On This Line |
 |
 |
|
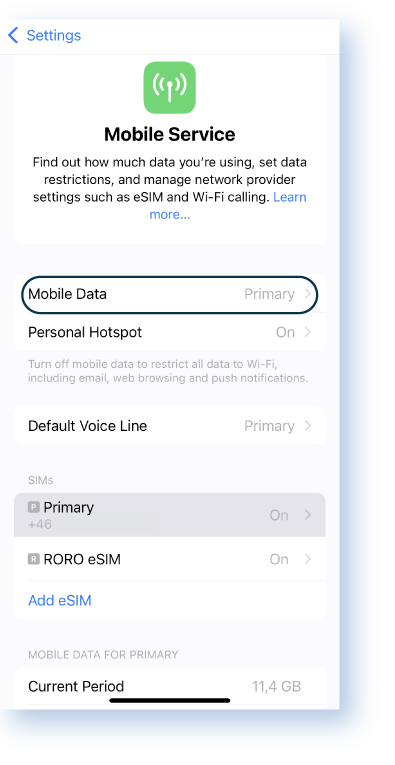
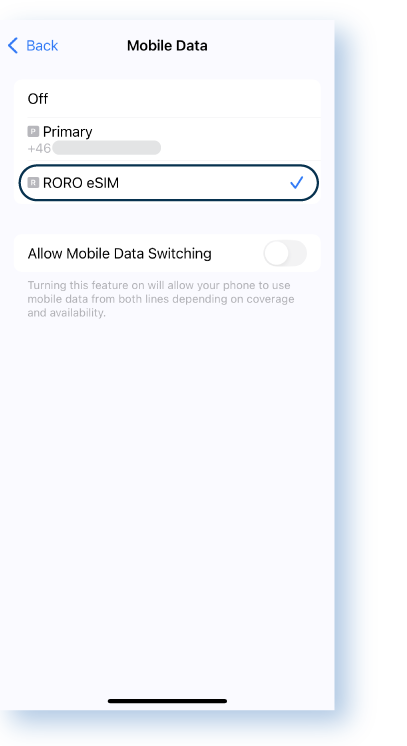
Back to Mobile Service, click Mobile Data |
Choose RORO eSIM for Mobile Data |
 |
 |
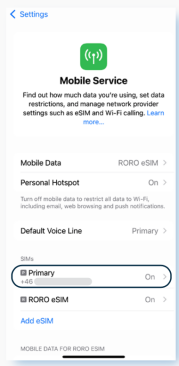
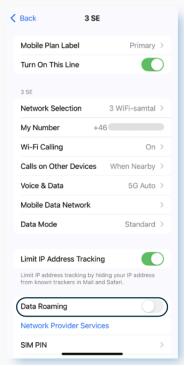
Make sure turning off data roaming for your primary number to avoid roaming fee on that line.
|
Go to Mobile Service in Settings, click Primary in SIMs |
Turn off the Data Roaming for this line |
 |
 |
Now you are all set! If you have any questions, please refer to our Help Center or contact our customer support!
eSIM Installation Guide for Android Phones
Different Android mobile phone brands may have different Settings menus. Connections, Network and Internet, Mobile Network, are the common names for finding where to add eSIM in the “Settings” of the phone.
Option 1: Quick Install If You Have The Latest Android Version
Open the rear camera of your phone and point it at the eSIM QR code. Your phone will automatically recognize the eSIM. Tap “Add plan to phone” showing up under the screen and click "Allow" to activate the new eSIM. It will be installed immediately.
|
Use camera to face the QR code, then click “Add plan to phone” |
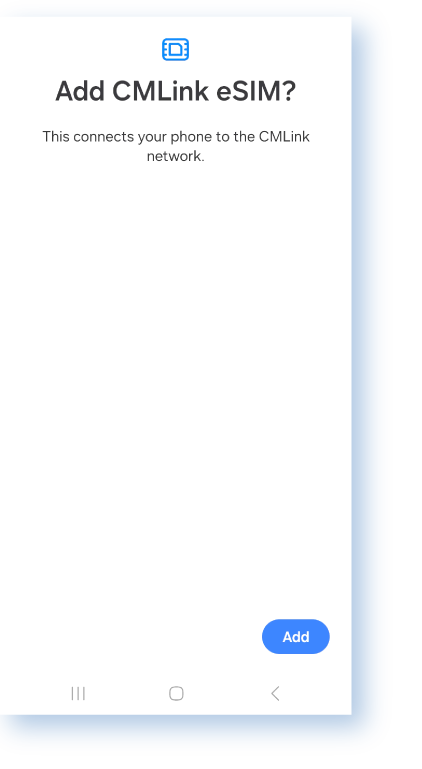
The phone will start checking and click “Add” to start the installation |
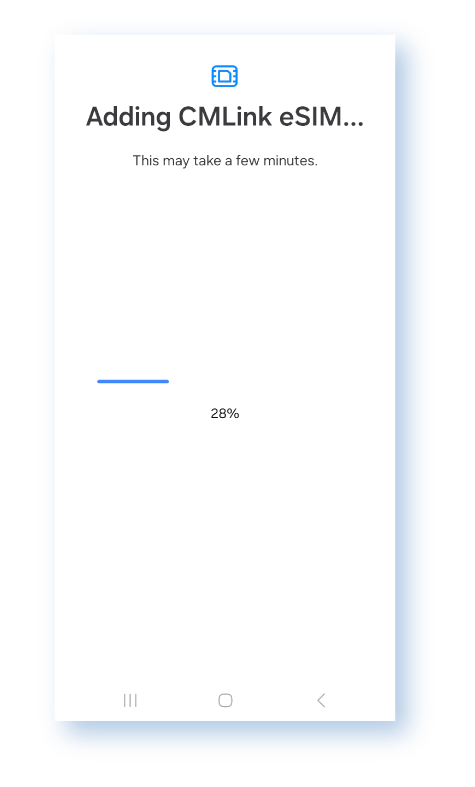
Installation will finish in about 1 minute |
 |
 |
 |
Option 2: Scan QR Code to Install From “Settings”
|
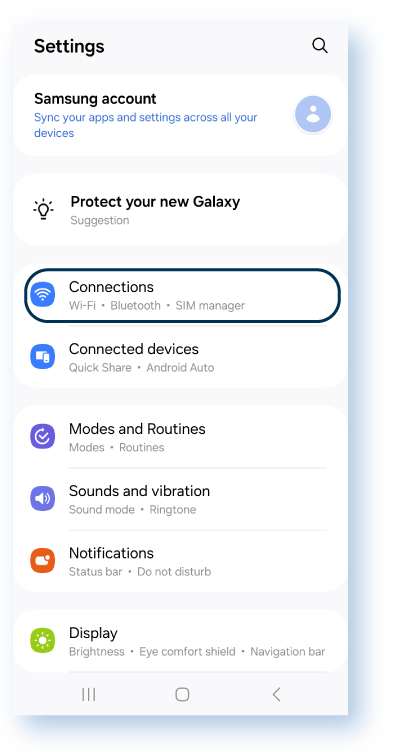
Go to Connections in Settings |
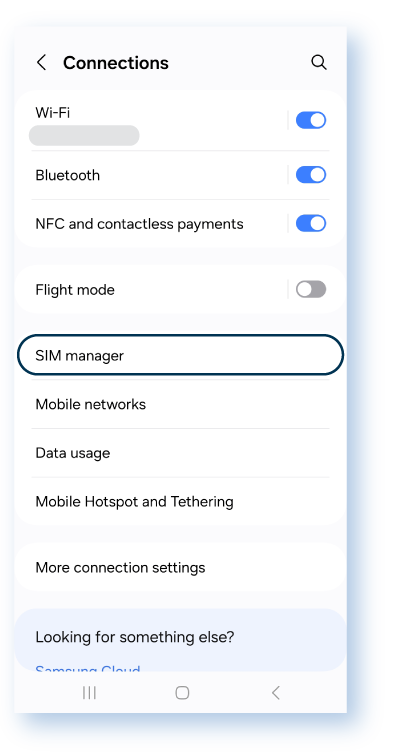
Go to SIM manager |
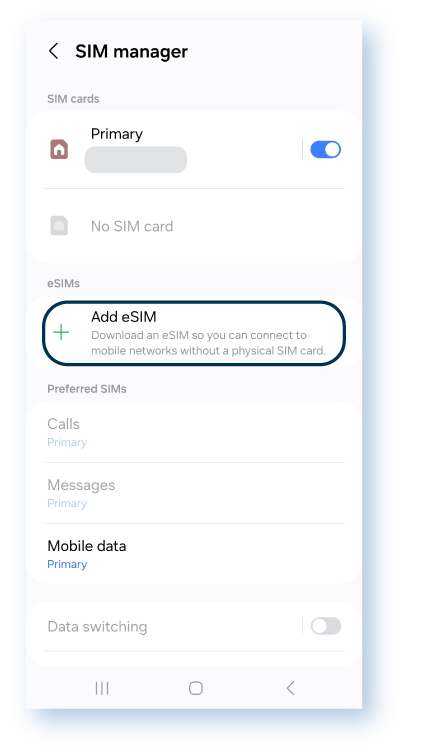
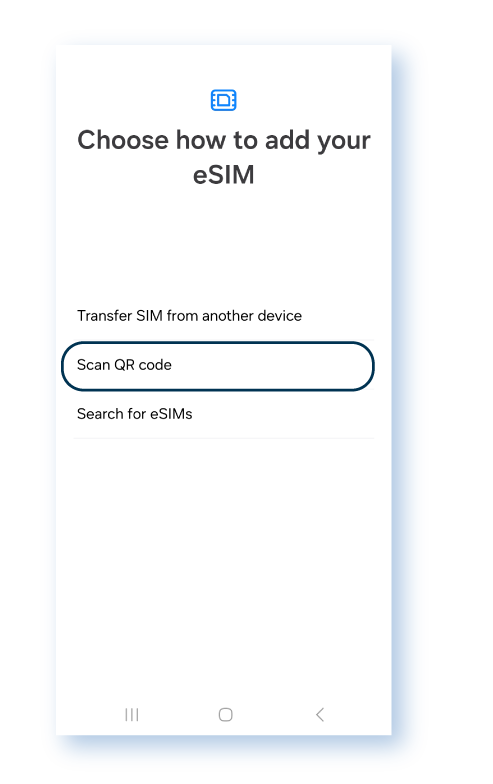
Click Add eSIM |
 |
 |
 |
|
Choose Scan QR code |
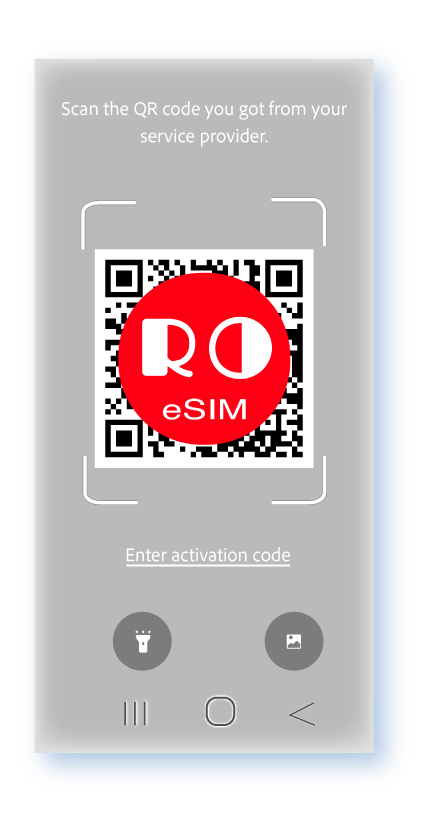
Scan the eSIM QR code from RORO |
|
 |
 |
Option 3: Manually Install With Activation Code
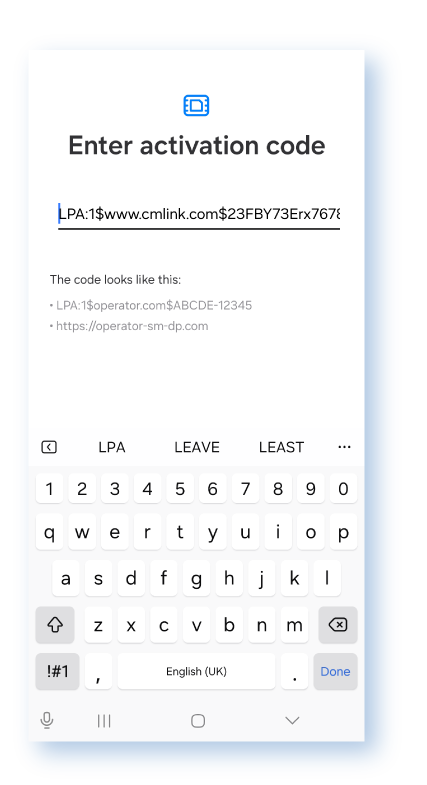
Click ![]() besides the Activation Code to copy, which can be found in My SIMs after log in to www.roroesim.com or RORO App.
besides the Activation Code to copy, which can be found in My SIMs after log in to www.roroesim.com or RORO App.
|
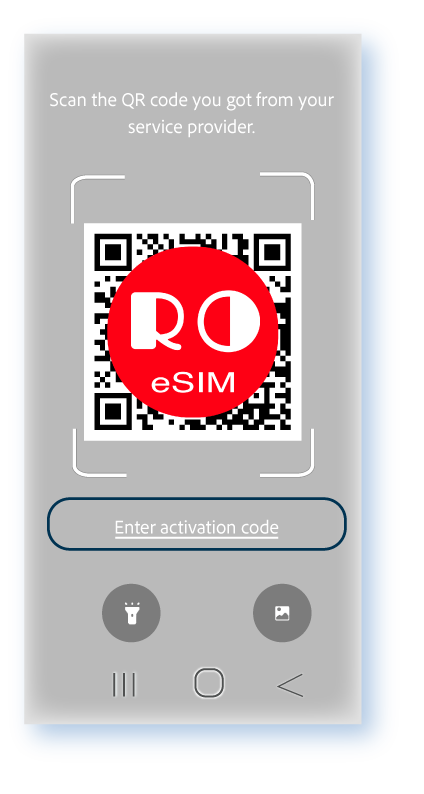
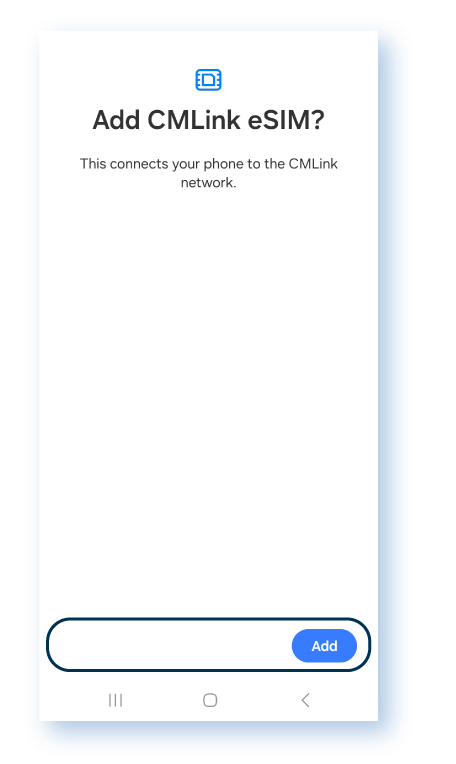
In Scan QR code page, choose |
Paste or type in the activation code, then choose Done. |
Click “Add” to proceed eSIM installation |
 |
 |
 |
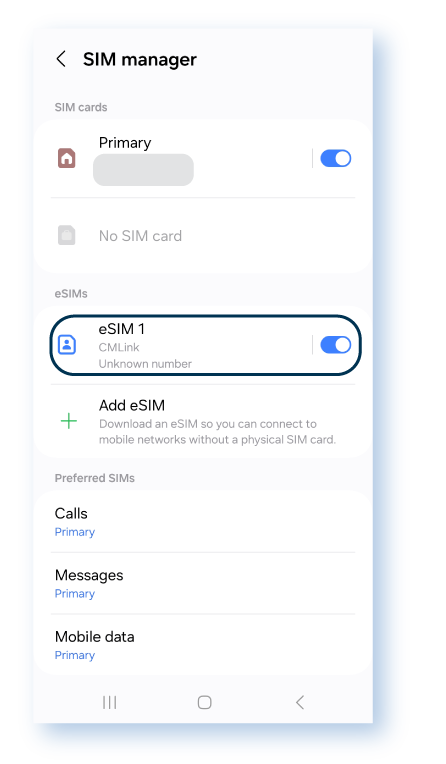
Label your eSIM: RORO eSIM is reusable. You can keep it in your phone for your future trips with only one installation.
|
Go to Settings > Connections > SIM manager, choose the new eSIM |
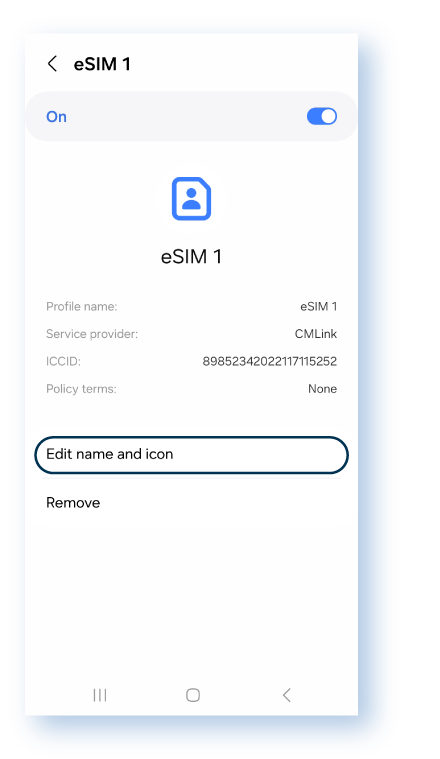
Choose Edit name and icon |
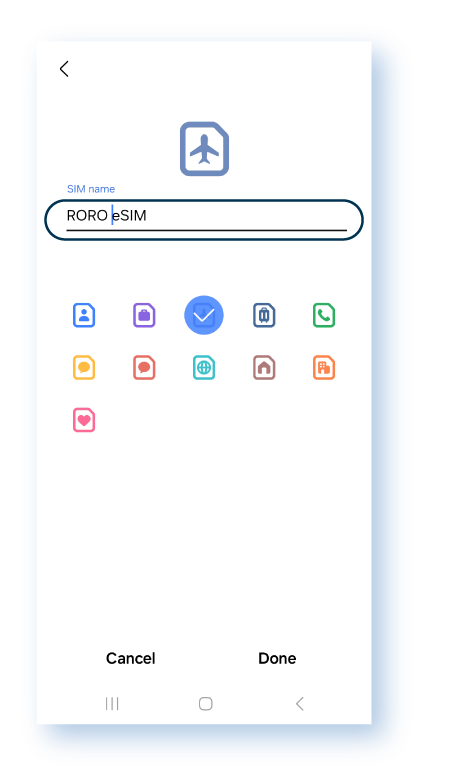
Rename and choose Done |
Your eSIM is labeled! |
 |
 |
 |
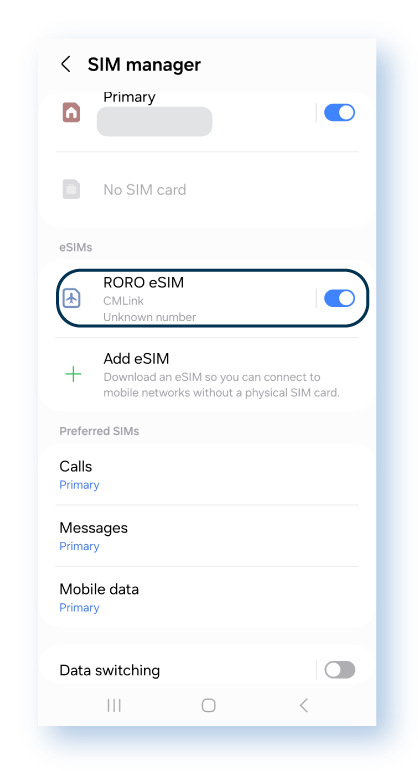 |
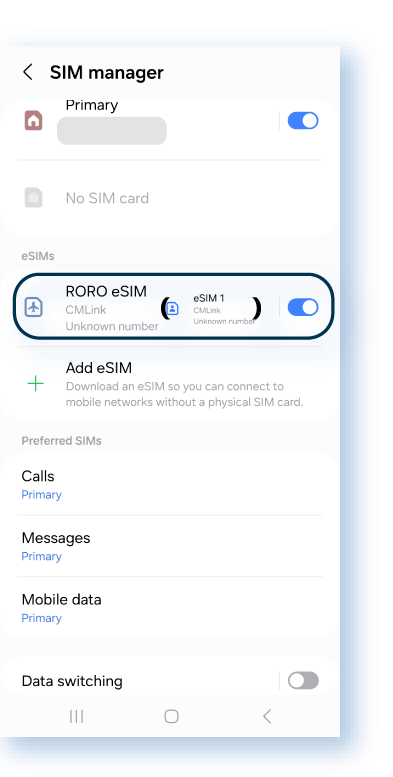
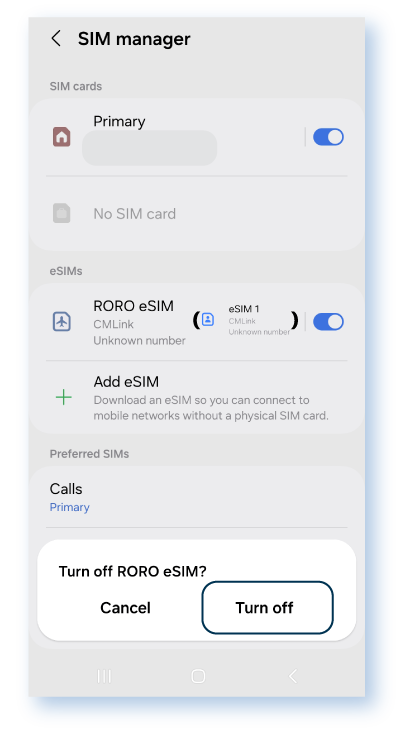
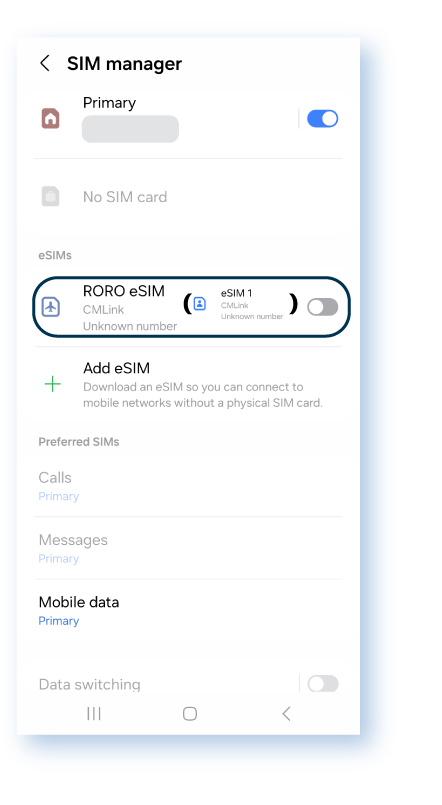
Keep the new eSIM line off until you arrive at your destination. The data plan will activate and validity days start counting from the minute that the eSIM connecting to the supporting network.
|
Go to Settings > Connections > SIM manager, choose the new eSIM |
Choose Turn off |
Keep eSIM off, and turn on after arrive at your destination |
 |
 |
 |
eSIM Activation Guide for Android Phones
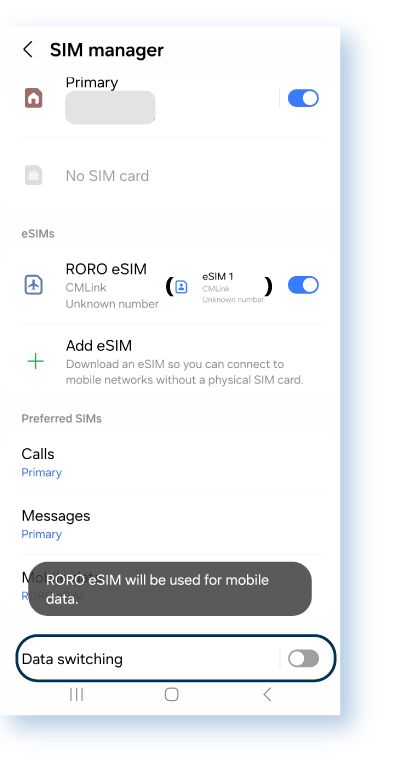
Turn on your eSIM’s Data Roaming and turn off primary number’s Data Roaming/ Data switching to avoide high roaming cost from the primary number. Using primary number as the default voice line to keep connected with your contacts.
After your flight landed at your destination, you can activate your eSIM immediately.
|
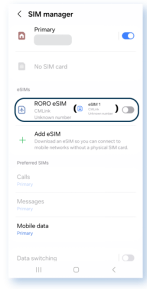
Go to Settings > Connections > SIM manager, choose the new eSIM |
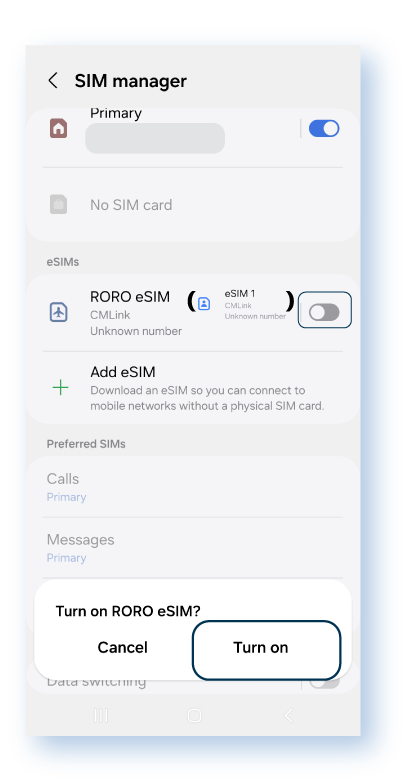
Click Turn on |
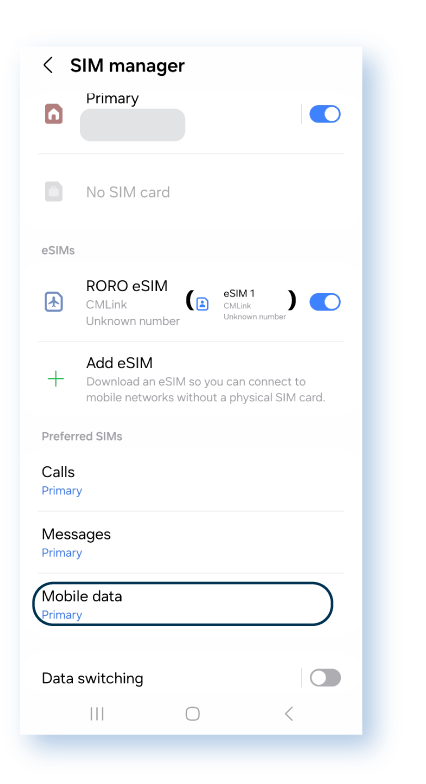
RORO eSIM is on, and click “Mobile data” |
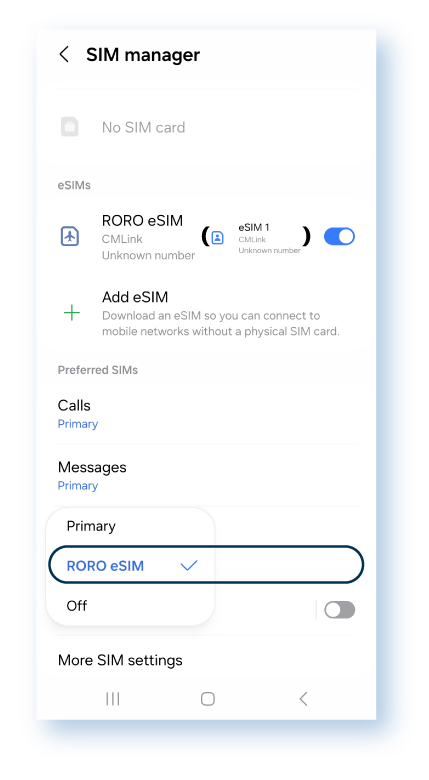
Choose RORO eSIM for Mobile data |
 |
 |
 |
 |
|
Keep Data switching off |
|
|
|
 |
Now you are all set! If you have any questions, please refer to our Help Center or contact our customer support!
